 |
|
|
|
||||||||||||||||


 톡톡
톡톡- > 전자키트
- > 프로세서/개발보드
- > Arduino(아두이노)
- > Adafruit
- 1/4 "삼각대 마운트가있는 Adafruit Raspberry Pi 카메라 보드 케이스
-
A3253 라즈베리파이 카메라 케이스 Adafruit Raspberry Pi Camera Board Case with 1/4inch Tripod Mount
상품번호 : 19429


기술
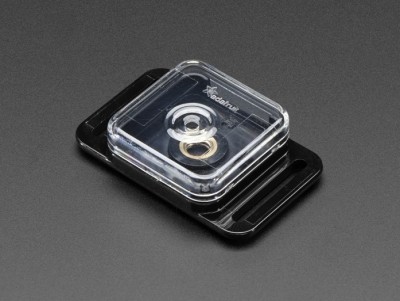
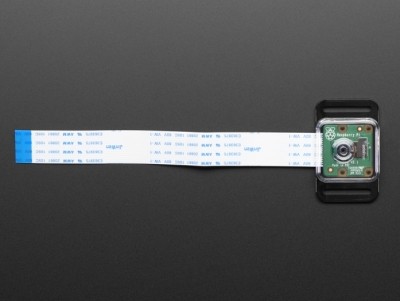
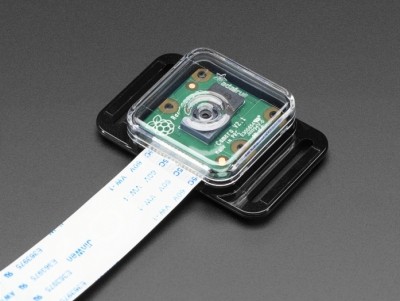
이것은 검은 기본과 맑은 상단과 기본, 고전적인 Adafruit 라스베리 파이 카메라 기판 인클로저 입니다. 이 케이스는 최대한 두껍고 단단히 결합 된 폴리 카보네이트 두 개만 들어옵니다. 이 케이스는 당신의 파이 카메라를 안전하고 안전하게 유지하면서 슈퍼 매끄럽게 보일 것입니다. Pi Camera v1 및 v2와 함께 작동합니다.
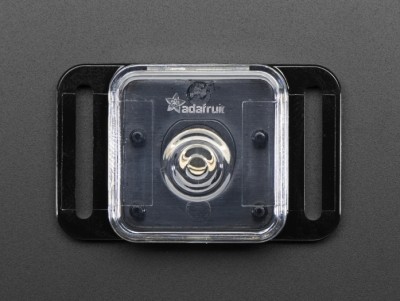
인클로저는 마이크 Doell에 의해 설계되었다 - 단지 라즈베리 파이 제로 슈퍼 광택 폴리 카보네이트, 울트라 내구성의 모델 B. 제작을위한 우리의 우아하고 아름답고 기능적인 파이 케이스처럼, 그것은 찾고 좋은으로 던져 정도로 힘든 모두 당신의 주머니, 책가방 또는 도구 상자. 카메라 케이블이 카메라 모듈에서 뻗어 나올 수 있도록 접근이 용이 한 슬림 한 입구가 있습니다. 카메라 보드는베이스에 잘 앉고 4 개의 작은 펙에 걸리며 뚜껑은 꼭대기에 꼭 맞습니다. 뚜껑에 작은 구멍이있어 이미지 캡처를 왜곡시키지 않습니다.
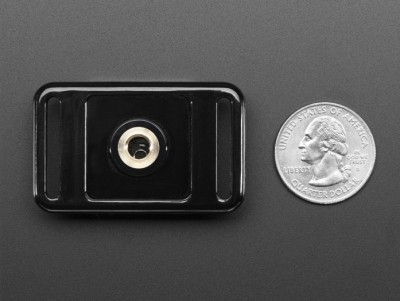
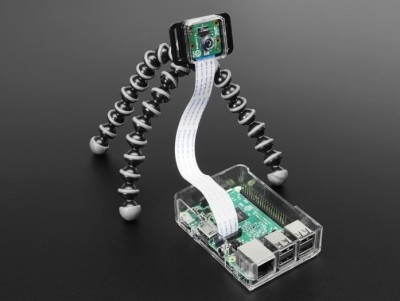
양쪽에는 슬롯이 두 개있어 카메라를 무언가에 끈으로 묶을 수 있으며 지퍼 - 넥타이, 테이프, 벨크로 스트랩 등을 사용할 수 있습니다!
뒷면은 표준 삼각대 나사 아무것도에 첨부 할 수 있도록 1/4 "삼각대, 너트를 장착입니다 우리가 슬림 너트를 사용하는 인클로저 소형을 유지하기 위해 주 -. 그래서 신중하게 사건을 연결하고 밀어하지 않도록주의 삼각대가 카메라를 통해 나사로 고정됩니다. 카메라 뒤쪽에 닿을 때까지 돌리고 1/4 바퀴 돌려서 나사를 푸십시오.
참고 : Pi Camera v2 (8 메가 픽셀)는 원본보다 조금 두껍기 때문에 초점을 맞추는 방법에 따라 카메라가 케이스를 눌러서 흐릿한 이미지를 유발할 수 있습니다. 가장 쉬운 수정 방법은 카메라 모듈과 PCB 사이에있는 끈적 끈적한 스페이서를 제거하는 것입니다. 부드럽게 PCB에서 카메라 모듈을 제거하고, 스페이서를 벗겨 내고, 카메라 모듈을 다시 연결하십시오. 문제 해결됨!
이 제품에는 2 개의 케이스가 있습니다. 라즈베리 파이 카메라 보드는 포함되어 있지 않습니다. 다른 케이블이나 커넥터 또는 액세서리가 포함되어 있지 않습니다!
원문
DESCRIPTION
This is a basic, classic Adafruit Raspberry Pi Camera Board Enclosure with a black base and a clear top. The case is as minimal as it gets, coming in just two pieces of polycarbonate that snap snugly together. This case will keep your Pi Camera safe and secure while also looking super sleek. Works with Pi Camera v1 and v2.
The enclosure was designed by Mike Doell – just like our elegant, beautiful, and functional Pi Cases for Raspberry Pi Zero and Model B. Made of ultra-durable, super-glossy polycarbonate, it is both good looking and tough enough to toss into your pocket, bookbag, or toolbox. It has an easy-to-access slim opening for your camera cable to extend out from the camera module. The camera board sits nicely in the base, latching to the four little pegs, and the lid fits snugly on top. There's also a tiny hole in the lid so not to distort the capturing of images.
On the sides there are two slots so you can strap the camera to something, use zip-ties, tape, velcro straps, whatever!
On the back is a 1/4" tripod mount nut, so you can attach it to anything with a standard tripod screw. Note that to keep the enclosure compact we used a slim nut - so attach the case carefully and make sure not to push the tripod screw through the camera! Just turn it until you feel it touching the back of the camera and then unscrew a quarter turn.
Please note: the Pi Camera v2 (8 Megapixel) is just a bit thicker than the original, which might cause the camera to press against the case and cause blurry images, depending on how it is focused. The easiest way to fix is remove the sticky-rubber spacer that is between the camera module and PCB. Gently remove the camera module from the PCB, peel off the spacer, and re-plug the camera module. Problem solved!
This product comes with 2 case pieces. Raspberry Pi Camera Board is not included. No other cables or connectors or accessories are included!
TECHNICAL DETAILS
2. 해외구매 특성상 주문에서 배송까지는 평균 10~15일이 소요됩니다. 간혹 현지 제품 수급에 따라 부득이하게 시일이 더 소요 될 수 있으니 구매시 좀 더 여유있게 주문하시길 권합니다.
3. 해외 내수품인 관계로 A/S에 대해서는 별도의 책임을 지지 않습니다.
4. 해외배송 특성상 주문접수후 배송상태가 배송준비중으로 넘어간 경우 해외에서 국내로의 배송이 이루어지고 있다는 뜻입니다. 따라서 배송준비중으로 배송상태가 넘어간 경우 취소및 반품이 불가하므로 이점 양해 부탁드립니다.
5. 타 해외구매대행 사이트에서 주문하신 물건과 주문날짜가 겹치지않도록 주의해 주십시오. 통관날짜가 같을 경우 합산관세가 부가되게 됩니다.
|